(If this is a composite, etc. please be honest with your techniques to help others learn)
If you would like your image to be eligible for a feature on the NPN Instagram (@NaturePhotoNet), add the tag ‘ig’ and leave your Instagram username below.
You may only download this image to demonstrate post-processing techniques.
Kathy, after getting a real comment on my trees image and an extensive visit to your website. I don’t see this is you. But there is a big possibility of me not seeing your intention. I do agree with Bradley about getting out of the norm sometimes . Lets stay in touch !
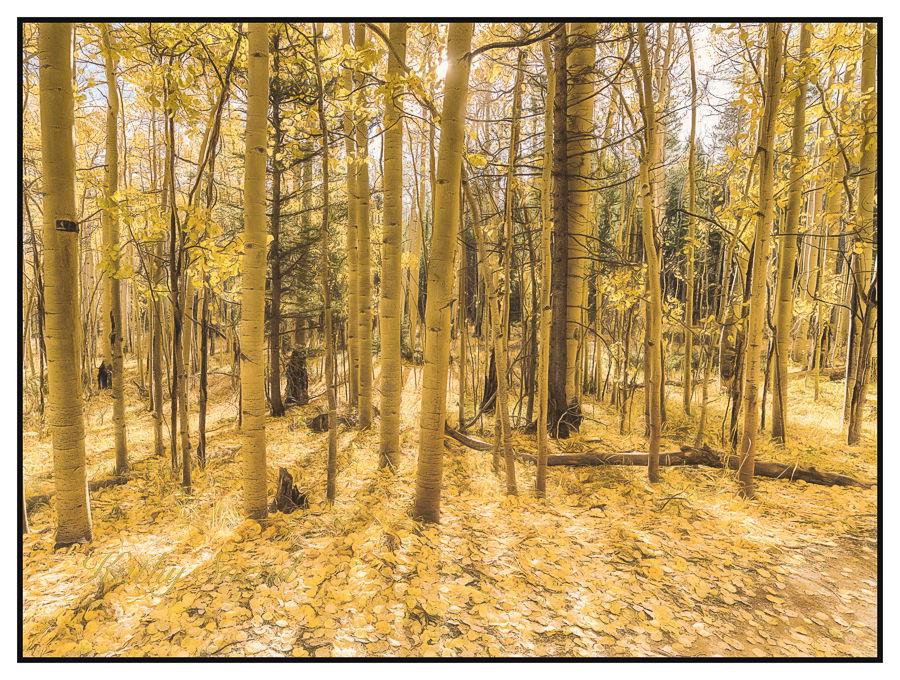
Hey @Kathy_Snead so i hope you don’t mind but I have made some editing to your image.
I like the composition and the ideia of making those yellows pop, but i have to agree with @Bradley_Strong, yellow shadows are not my thing either.
So i ajusted the level of the shadows and the highligths and reduced saturation on both trying to maintain the pop on those yellows.
@João_Ferrão
I like what you did. I struggled with this as the trunks seemed to glow when I was there but when I adjusted the trunks, it also adjusted the shadows of the trees . Could I trouble you to tell me specifically how you made the adjustments? Sitting here in LR, I just cant reproduce and don’t know how to decrease the yellows in shadows independently.
Here is the best I can come up with on a redo. The reason I took it into Topaz was due to the enormous case of black spot on the leaves on the ground. I wanted to minimize that a bit plus give it a dreamier look. It was just so hard on this one to get it to what I saw at the time. I sow glowing tree trunks but they were in the shadows. When I brought the shadows up for the trunks, the shadows on the ground also were effected. Joao achieves a much crisper picture. Not sure why that is.
Hey @Kathy_Snead, no trouble at all, i remade the editing so i can send you the photoshop file, so the image can be a bit diferent of what i sent earlier.
The perfect tecnique for this image could be luminosity masks, but im Just learning to use them.
So:
1- Added a ''Treshold layer" so i can pin the darker and brighter spots of your image using the color sample tool.
2- Using those marked spots i ajusted the darker and brighter limits on an cruve ajustment layer.
3- Going in the ‘‘Select’’ drop menu and using color range, then on select using shadows i created a saturation ajustment layer masked to afect the shadows so i could bring down the saturation of the shadows only.
4- Repeated step 3 but for the highlights now.
5- Added a extra curve layer to pop even more the contrast.
And thats it.
Here’s my take on a B&W. The histogram on the jpeg is blown out in the whites and blacks. High contrast images practically demand to be B&W. The original file is surely more editable.
@João_Ferrão
Thank you for this. I have much to “google” as I have never done any of these things. That is good as I do want to better learn PS. I mostly hang out in LR.
I have been told as well that I need to get the luminosity masks and learn them. I believe in that approach just want to set aside a time to do it …
The composition is spot on I think, Kathy. I really like the shadow on the ground and I think this is very well seen. The contrast does look a little weird and your redo is on the way there, I think… I would also definitely keep this in color. I think it’s part of the magic. I would bend the yellow to something less magenta-ish. It’s a beautiful section of the forest for sure.
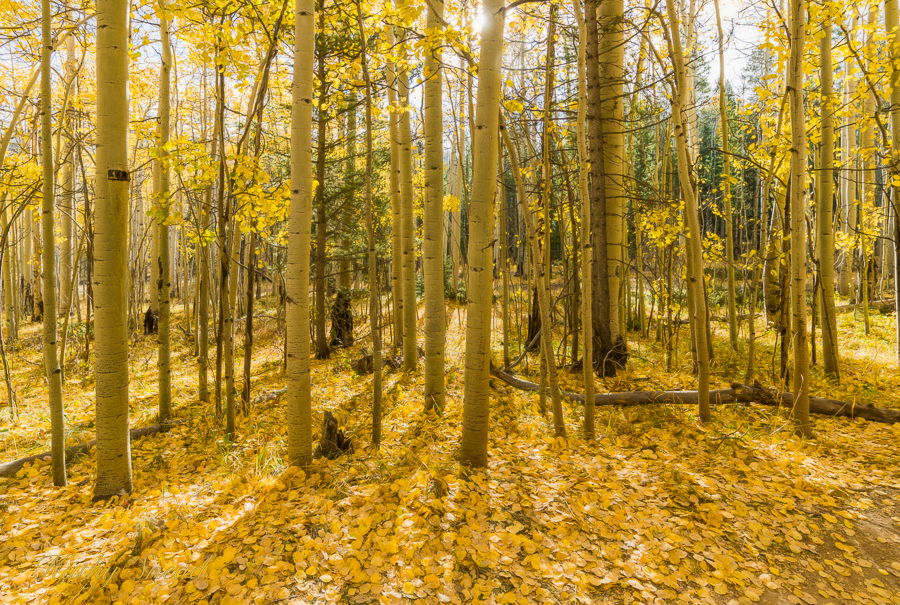
Kathy, I really like your composition with this image. Overall it is over-exposed. I’m not sure if this is due to image capture or processing.
I think I remember you saying on a previous post that you were less experienced in shooting landscapes so I would recommend exposing an image such as this so by exposing to the right. That just means when you look at the histogram you want to make sure that you have the highlights as close as you can to the right hand side without having them climb the edge of the histogram (known as clipping). This technique will prevent the highlights from being overexposed. The image that you see on the LCD will be very dark. With the D850 you would probably be ok to capture it in a single exposure and recover the shadow detail in RAW processing. With that said, it’s always a good idea to go ahead and bracket exposures to make sure that you capture all of the shadow detail.
Hi Bradley
I checked and I did expose to the right, and the original is dark as you suggested. I always expose to the right with my birds and flowers so I just do it all the time -
I think the issue is that I saw something in my head that maybe was an incorrect recordation of the scene. Im trying to create what I think I saw and it is way off! I used to take an iPhone photo of the place (or years ago I had a little jpeg auto camera). Should have done it here.
I am relatively landscape deficient! I used to do landscapes all the time, but got enthralled with flowers and birds and did more of those, while doing landscapes here and there. They say “use it or lose it” and that is certainly true with the finer points of landscape photography. Additionally, I have hesitated to post on the landscape board here just because I know my limitations! You guys (and gals) are so helpful but the board is a little daunting to me due to the high level of ability both in capturing scenes but also in PS and other post processing. I am working to correct that, but it takes time!
Hi Kathy, Since you did expose this image to the right I would be curious to see what this would look like if you went back to the RAW file on this image. Typically when I expose to the right and have a scene with a lot of dynamic range I usually first adjust the exposure slider (which generally selects the midtones) to brighten the image making sure that in doing so I don’t clip the highlights. You may have to darken your highlights a little after you make this adjustment. After I get the overall midtone exposure where I want it I then adjust the shadow and black sliders to lift up the shadow areas to where I want them paying careful attention to the histogram. Once I get it to this point I usually go back and tweak all of the sliders until I get the exposure exactly where I want it so that the histogram shows that the highlights are not overexposed and the shadows are not underexposed. If you were to go through that process I would be interested in seeing the result. In my workflow I usually make the basic exposure adjustments in Lightroom and then do some final tweaks in Photoshop using levels and curves adjustments. I use Tony Kuyper’s Luminosity Mask actions so that I can make selections based on the tonality of the image in order to better target the adjustments that I make in Photoshop, but that is a bit more of an advanced step. I think if you did that you would arrive at a more natural looking result if that is your aim. Anyway I hope this is all helpful. I agree that there is a steep learning curve to processing these kind of images. It seems like there is always more to learn.
I am not familiar with the Topaz plugin settings as I don’t use it in my workflow so I can’t help you there.
Since this scene is backlit I would expect to see some deep shadows which are missing from the image above. You really need the deep shadows in order to get see the impact of the backlit leaves on the aspen trees.
Hi Brian
This explanation was very helpful. I am attaching images of the result. First I did as you suggested in LR. Then I did both Orton and then Topaz Impression. The pics here are not in Order. The third one is the one just done in LR. The second one is LR plus Orton in PS. The first one is LR plus Orton and Impression in Topaz. I cant get the order to turn around.
This was an interesting exercise as when I did the Orton, it changed the histogram and I had to readjust. The same thing happened when I did Impression. Never realized that would happen and it was a real learning curve.
Thanks again for the help. I like this approach better than the HDR.
Best
Kathy
Kathy, your reposts are much improved. I think the third image is the best of the bunch. Based on the histogram the highlights in the sky are still overexposed. I’m not sure if you have that detail in your RAW file, but if you do it would be worth trying to recover them. I made a few tweeks to the midtones and shadows using luminosity masks and have uploaded an example. For my tastes at least I think you are flattening the contrast a bit too much so I have darkened the shadow areas a bit.
If you are interested you can find more information about luminosity masks here:
Luminosity masks are an important component of my work flow, as well as many other photographers here on NPN. Tony Kuyper, who is a long-time NPN member, is offering his V6 action panel for free. The V7 is the latest and greatest version, but the V6 actions work just as well. He has just made a few tweeks to the user interface in the latest V7 panel. I would highly recommend Sean Bagshaw’s tutorials (also an NPN member) for the luminosity masks. They have been very helpful to me. There is a bit of a learning curve, but Sean’s tutorials help shorten the learning curve. Both Sean and Tony have YouTube channels and they offer some free tutorials there as well. Those tutorials help give you an idea of what is possible, but in my opinion the full tutorials are worth the price.